USB CNC Upgrade - May 2020
When my desktop PC failed I thought that after buying a new desktop PC with Windows 10 and adding a new parallel port card I would be up and running again in no time.
Unfortunately, as soon as I started up Mach 3 on my new desktop PC I immediately found the machine would not jog and there were issues with the parallel port driver.
I Googled the CNC troubleshooting pages and quickly found out that the Mach 3 parallel port driver is not compatible with Windows 10 and I would need a USB, compatible controller.
As a temporary workaround, I tried installing Virtual Box and Windows 7. I was able to get the machine to jog but when set to the original feed rates and jogging speeds it would skip steps.
I eventually got the machine to run by reducing speeds to around 1/4 of the original. It allowed me to cut the parts out that I required however it was painfully slow.
After some research, I found that I would need a new USB Controller and separate stepper drivers.
My original parallel port board was an all in one Mechatronics 4 axis parallel port combined controller/driver board. This board worked fine with Windows 7.
The parts I settled on are
1 USB MACH3 100Khz Breakout Board
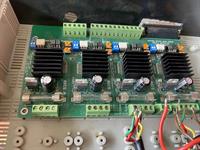
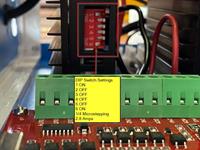
3 TB6600 Stepper Motor Controllers (1 for each axis X, Y and Z)
1 24 Volt Power Supply 360W 15 Amp
1 Enclosure to house controller and stepper drivers dimensions 250x190x110mm
1 DC-DC converter for stepping down the 24 Volts to 12 Volts for a cooling fan.
1 Terminal block to split the 24 Volt input for powering the USB controller and the 3 Stepper Drivers
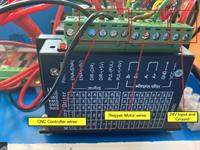
Wiring was fairly straightforward. To identify the correct wiring for my stepper motors I found this site Hobby CNC Australia. I matched up the wiring colour and was easily able to identify the A+, A- B+ and B- wires.
The instructions that came with the CNC controller are in Chinese however there are plenty of sites on the web with these instructions in English.
One of the best sites is BuildYourCNC. You can purchase the board from the site and it has instructional videos on wiring up the controller and stepper drivers and configuring Mach3 for the RNR USB Driver.
You may have to adjust the motor outputs in Mach 3 as I found that initially, my stepper motors were jogging in the reverse direction.
I mounted the controller and stepper drivers in an enclosure on nylon standoffs and added a fan to help with cooling. I will at a later date mount the fan on the outside of the enclosure with an additional fan and wire the two in series directly to a 24 V output from the power supply. I will use the DC-DC converter for a limit switch circuit.
Currently, my power supply and enclosure are sitting on top of a plastic box. I will be shortly securing these to a plywood baseboard and anchoring the cables so that they can't be pulled out.
I wired up some strip LED's to the router base to illuminate the workpiece using one of the 24 V outputs. The LED's are rated at 12 Volts so I cut two strips of 6 and wired these up in series. These help greatly when zeroing the Z axis, especially when cutting a thin Balsa sheet as any inaccuracy could lead to tabs being cut through and the part separating from the sheet prematurely resulting in the part becoming damaged.
After the upgrade my CNC is up and running again and I can jog at up to 1000 mm/minute and am back to cutting Balsa sheet at 600mm/minute. I have cut out ribs for 2 wing sets and will be cutting out more parts in Balsa and Ply sheet over the next few weeks,
No Comments
Date Posted: 18/05/2020 9:00:00 PM
Winfoil 3 Other Details
User Portal
Articles
- 2FA
- 3.0.49
- 3.0.51
- 3.0.52
- 3.0.53
- 3D Printing
- 3D Printing for RC Aircraft
- About
- Activation Enhancement
- Airfoil List Screen Enhancement
- Airfoil List Screen Enhancements 2
- Airfoils
- Airfoils not showing after import
- April 2020
- APRIL 2021
- August 2020
- CNC
- CNC Router
- Creality
- Decals
- Default Length Units
- Design Specification
- Download Winfoil
- DXF Export Enhancement
- End Mills
- Ender 3 Pro
- FEBRUARY 2021
- Issue
- JANUARY 2024
- Jig Hole Washout
- July 2020
- June 2020
- Lost Password Link Issue
- March 2020
- MARCH 2024
- MAY 2020
- October 2020
- Print Orientation Issue
- Roadmap
- Show Password
- Two-factor Authentication
- V3.0.45
- V3.0.52
- V3.0.53 APRIL 2021
- V3.0.55
- V3.0.56
- V3.0.57
- Version History
- Washout
- Weight and Balance
- Winfoil V3.0.51
- Winfoil V3.0.52 MARCH 2021
- Wing Plan View


